segunda-feira, 5 de junho de 2017

Playing with normal and speculars

Greetings modders!
 I am slowly trying to offer you new features for my mods, sadly for jomo there´s no applier available so far
This tutorial works either for Jomo werewolf and leopard warrior... (and future mods using Normal and specular maps)

*TAP PICTURES TO ENLARGE THEM:*

1. VERY IMPORTANT - these features are just noticed if you are using graphics on high and above, else you won´t be able to "see" them.

any graphic resolution - (without normal and speculars)
graphics on high and above - with spec and normals


ok,, once you have the computer set for the required Graphic settings. we can start:

press ctrl+P and graphic tab...
I recomend you to start from head then work other parts, In case you have Jomo Leopard warrior, this is even more important due all expression layers..

2 DROP Body on ground:

Select everything and pressing edit selected + Shift tab, deselect other parts lipe upper, legs, whiskers and eyebrow fur:
Process is similar as applying textures, but this time we´re checking Bumpiness button area.
normals are applied on bumpiness area... head, for head, upper for upper part, legs for legs and tail for tail

see? you select in the same way.. but here we have checked the texture area. 


deselecting whiskers anf face fur can be a tricky task....


remember to check Bumpiness area in order to apply normals:

headnormals for head

legnormals for legs and so on

tail you might want to uncheck edit linked parts since both tail parts get the same texture, same normal texture and same specular texture
Once you have whole body worked you can start the Specular maps...
use shininess tab to work specular textures.. same process.. edit everything, check edit linked parts  and select +shift to deselect areas ( upper , legs, whiskers, face fur)

same for... head spec for head part, upper spec, upper, tail spec for tail and leg spec for tail

that´s what you should see
 IMPORTANT:
in case you do not want  spots so visible, you can try applying normal maps on  shininess tab... the efect is similar but the spots are more discrete.


Hope you have a good time customizing your avatars, in case you need any help or support, please contact me inworld or drop me a notecard.

Happy modding!!!

terça-feira, 25 de abril de 2017

Los Lobos

Yoo again,

here comes a short tutorial about Jomo Werewolf avatar modding.
I am taking the Shiba inu mod for this tutorial but it works for all.

as most avatars, it is always better working with the pieces on ground. Most viewers do not allow you to edit and add textures to objects, avatars and parts while you are wearing them.

drop your Jomo werewolf avatar - any color, bento and regular work the same. touch and Edit.... you have to check Linked parts
Ok, pick a part and drop onto the ground, edit and remember to check Linked Part to add textures for diferent parts. I always start with the head which is the most tricky part, but its really up to you.
Note there are small pieces like eye shiny effect, tongue, teeth lines and a ring around the neck part.
Edit linked part 
 You can also edit mane and move it a bit to work neck.. it wont misplace when you wear the avatar because its already rigged.

head has many diferent faces... touch main part to add texture., no need to edit face by face now.

pick neck ring using linked parts and select face.. add the texture you are going to use for torso. 

keep on the work, add upper part texture for torso parts.. 

for some reason the legs claws require a proper texture.. edit them and ad it
 Note that Mane piece has many faces, i have tinted them to help you see some of them.
For some mods i added 2 or 3 diferent fur textures.
You may want to edit linked part, selec face to add diferent textures for mane
some mane faces.

 For shiba inu mod i have just added a lighter part near face. but it´s up to each modder work or not work it.


Remember to drop tail and texture it.
For anubis i provided extra textures for tongue and teeth, you might want to edit them and add the golden color, but selecting face.
for penis piece, proceed the same way, or use ctrl+alt+T to see invisible parts and drop texture
Hope its not so difficult and you can enjoy your mod.
 Happy Modding!!

quinta-feira, 19 de janeiro de 2017

Nidoqueen proportions _ for the regular sized ravenoid chubby body

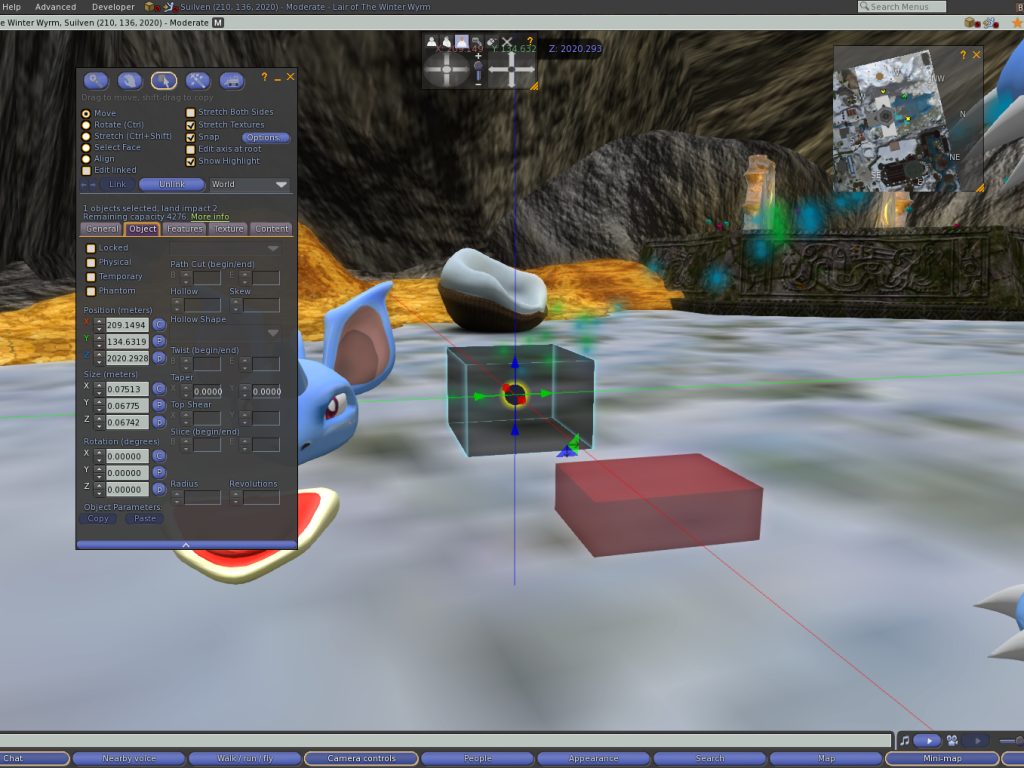
Ok,  drop the boxes and the pieces... those boxes are made to follow the shape proportions i have included on the notecard. 

now, edit it the box  by choosing the object tab and position area.. press the C ( copy) button( its the small ones near the position /size and rotation values.. ( C= copy, P = paste , second P is paste from clipboard.. but usually doesnt work so fine.. so i avoid it)

go to objects tab and press C - at the position values area.
 Then, edit head, by going to object tab and press P to paste value and move the head to same box position.

 Im considering just the Head object.. do not worry about ears and horns. when you move it, edit whole object again to resize and make skull object  fit with the box... check the images..
After moving.. the head wont place perfectly fitted with the box.. you gotta move and resize the head ( as whole, do not try edit linked parts.. eyes and ears are going do lose their correct place), and do not stretch the proportion box.

move and resize the head., check the following pics for a better idea.


once done, repeat process for other parts.. ive dropped a huge muzzle to help you understand the resizing process.. its a bit slow.. but the idea is getting the best result.


whoa.. muzzle piece is huge! :D

too tiny.. do noe be afraid.. the proportion box is made to make it fit with the head


voilá

repeat process with arms pieces


same for legs


and feet

finaly tail